
Have you ever wondered why, occasionally, your YouTube videos appear blurry or low-quality after posting?
It can be disheartening when you’ve worked hard to create a video that doesn’t seem as crisp and clear as you had hoped.
We’ll look at the typical causes of this problem in this post and explain what you can do to make sure your YouTube videos upload in the highest quality. Knowing these elements, regardless of your experience level, will enable you to provide your viewers with better-quality films.
Why Does My YouTube Video Upload In Low Quality?
The main reason for low-quality video is your video settings while you are uploading the video. Your video will upload in low quality if it was recorded or exported at a low resolution or bitrate. Moreover, a sluggish internet connection may result in uploads of low quality.
YouTube is compatible with various video formats, but not all are ideal for uploading excellent content. If you want superior quality, stick to codecs like MP4 that use the H.264 codec.
When watching the video on YouTube, pick the appropriate resolution. Because the player may occasionally default to a setting of lesser quality, it is necessary to manually pick the highest possible resolution to achieve the best viewing results. Here are the reasons why your YouTube Video upload quality is low:
- Video Encoding Settings
If your video encoding parameters do not align with YouTube’s requirements, it can reduce video quality upon upload. - Slow Internet Connection
With a sluggish Internet connection, your upload performance is restricted. This restriction may result in lower-quality video compression. - Video Rendering Quality
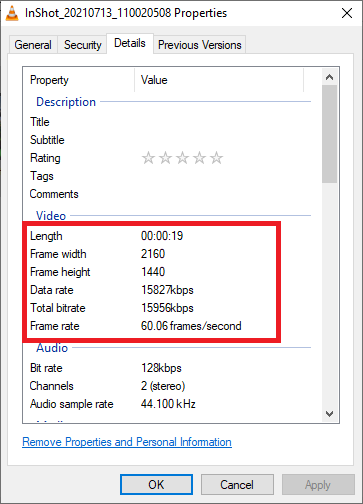
If you render your video at a low resolution or with low bitrate parameters, the resulting upload may be poor quality. - Video Bitrate
Less data in low-bitrate movies can decrease overall visual quality, color correctness, and picture sharpness.
How To Upload High-Quality Videos on YouTube?
You can fix it by selecting the right encoding settings when uploading high-quality videos on YouTube. You must export your videos in higher pixels for the most amazing results. 1080p and 4k videos are considered among the best and highest video quality.
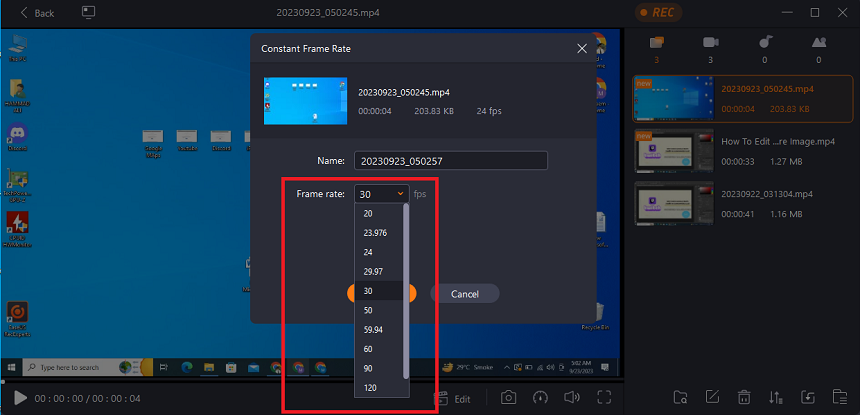
Moreover, it also depends on the frame rate you use while exporting your videos. If you upload a motion film, go with the 60 frames per second (fps). It is considered the best setting to get smooth and high-resolution video.
Another important factor is your internet speed. Internet speed decides the time of uploading the video. If your internet is slow, it will suggest you upload low-quality video in 480p or 720p, which is not considered high-quality video. That is why you always choose a high-speed internet connection to upload your videos. Here’s how you can upload high-quality video on YouTube:
1. Select the Right Encoding Settings
2. Improve Your Connection With Fast Internet
3. Choose the Appropriate Video Format
4. Produce Videos with a High-Quality Render
5. Choose the Highest Available Bitrate
Select the Right Encoding Settings
Select a resolution that corresponds with the level of quality present in the video footage you intend to upload. The three most popular resolutions, which offer incredibly high quality, are 720p (1280×720 pixels), 1080p (1920×1080 pixels), and 4K (3840×2160 pixels).
YouTube videos can have frame rates of 24, 30, or even 60 frames per second (fps). Frame Rate YouTube videos can have frame rates of 24, 30, or even 60 frames per second. 24 frames per second (fps) for a more theatrical appearance, 30 frames per second (fps) for regular video, and 60 frames per second (fps) for better motion in action films.
Given its superior compression capabilities and no impact on video quality, H.264 is the codec advised for use with YouTube videos. The recommended bit depth for ordinary videos is 8 bits, but for HDR (High Dynamic Range) material, 10 bits or greater is required. Keyframes can assist with both the compression and searching processes of a video. Keyframes should be set at regular intervals.
Improve Your Connection With Fast Internet
It is necessary to have a connection to the internet that is consistent and quick to upload films of good quality without any disruptions. Using a connected Ethernet connection whenever available is best to maintain a constant upload speed. Consider upgrading to a higher-speed internet plan to reduce the time it takes to upload files.
Choose the Appropriate Video Format
YouTube is compatible with several video formats, but the MP4 format is the one that is preferred because of its widespread use. Ensure that your video’s aspect ratio is compatible with the resolution (for example, 16:9 for 1080p). This format can only be selected when you are exporting the video from your recorder or editing software.
Produce Videos with a High-Quality Render
Make sure your films are of the greatest possible quality by using professional video editing software to edit and render. Throughout the editing process, your video should keep the same quality and aspect ratio that it originally had. When rendering, you should avoid excessive compression as much as possible because it might reduce the video quality.
Choose the Highest Available Bitrate
The quantity of data transferred per second in your video is called the bitrate. A video with a higher bitrate will have higher quality, but the associated file size will be bigger. Here are a few suggestions from YouTube for the bitrate:
- 3,500–5,000 Kbps for 1080p video at 30 frames per second
- 1,500–2,500 Kbps for 720p video at 30 frames per second
- For the best possible picture quality in 4K movies, a bitrate of 10,000 to 20,000 kilobits per second is recommended.
Encoding with variable bitrate (VBR) allows more data to be allocated to more complicated scenes while less data is allocated to simpler sequences, thereby maximizing quality.
Why Does YouTube HD Video Looks Blurry?
It is because of the low video quality you have selected while playing the video. Content makers should post videos in the highest quality possible, ideally in 1080p or 4K, so that HD videos look crisp and clear on YouTube.It gives YouTube’s compression algorithms more data, boosting viewing.
The second most annoying reason is the buffering issue due to your sluggish internet connection. Sometimes, it also occurs due to slow YouTube server response. But it happens merely because YouTube has an amazing server and backup system to feed the internet.
Video Upload Quality
There are situations when the individual who posted the video is the source of the problem. If the original video was uploaded in a lesser resolution, such as 480p, selecting HD settings will not suddenly transform it into HD. The importance of the source quality cannot be overstated.
Device and Screen Quality
It also affects what kind of gadget you use to watch the video. Suppose you are utilizing an older device or one with an inferior-quality screen. In that case, it is possible that you may not be able to fully enjoy the HD resolution, which will cause the video to appear unclear.
Buffering Issues
The video will load ahead (known as “buffering”) so there are no disruptions. You could see a grainy video because the software is having trouble loading the high-definition material if the buffering is too sluggish or it gets interrupted.
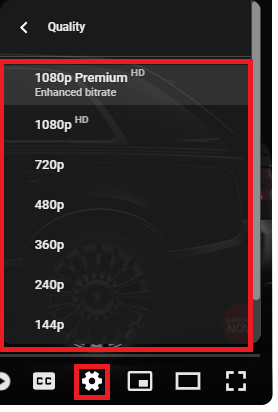
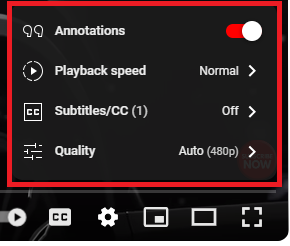
Video Player Settings
It’s possible that the video player settings on YouTube aren’t always adjusted to provide the best possible quality. You can manually alter the video quality settings by clicking the gear symbol on the video player and choosing a better resolution from the drop-down menu that appears.
Browser and App Issues
Various web browsers and YouTube applications can manage video quality in various ways. It is possible that some may not allow HD playback or that there may be compatibility difficulties that cause the video’s clarity to be compromised.
Tips To Improve YouTube Video Upload Quality
You must follow some quality rules to get the best results after uploading your video on YouTube. These video settings and recommended color gradings will make your videos amazing. Here are some of the best tips that will support you to get amazing video uploads.
- High-Resolution Video
Start by making or recording your videos in the best quality you can. There are many formats that YouTube can handle, but for the best picture, use at least 1080p (Full HD) or 4K. If you use higher-resolution source material, your movie will still look great after YouTube compresses it.
- Bitrate and Compression
When you encode videos, pay close attention to the bitrate options. A higher bitrate keeps more of the video’s features and reduces the number of compression flaws. For smooth viewing, find a good mix of file size and quality. For 1080p video, a speed of 8 to 12 Mbps is usually enough.
- Correct Aspect Ratio
Make sure that the ratio of your movie is right. For widescreen, it should be 16:9, and for standard, it should be 4:3. Using the wrong aspect ratio can cause black bars or stretching, which hurts the quality and viewing experience as a whole.
- Framerate
To keep the look constant, match the frame rate of your movie to that of the source material. All common choices are 24fps for a movie-like look, 30fps for normal video, and 60fps for better speed. The frame rate must be the same for your movie to look professional.
- Video Editing Software
Use expert tools like Adobe Premiere Pro or Final Cut Pro to edit and export your movies. Advanced options in these tools let you improve video quality while exporting.
- Color Correction and Grading
Use color correction and editing to make your movie look better. If you make the right color changes, your content will look and feel much better overall, making it more interesting for users.
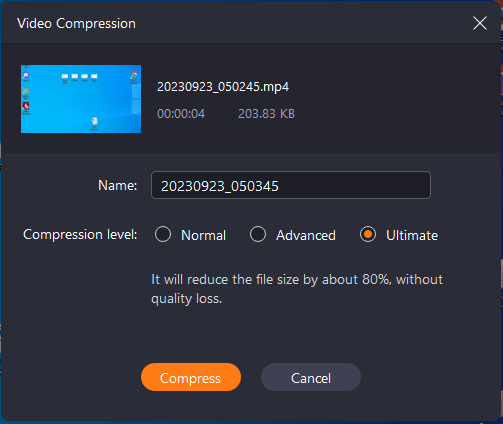
- Optimize for YouTube’s Compression
Remember that YouTube will reduce your video for you while you share it. To keep the quality as high as possible, export your video with the best quality choices, like a high bitrate and no extra compression.
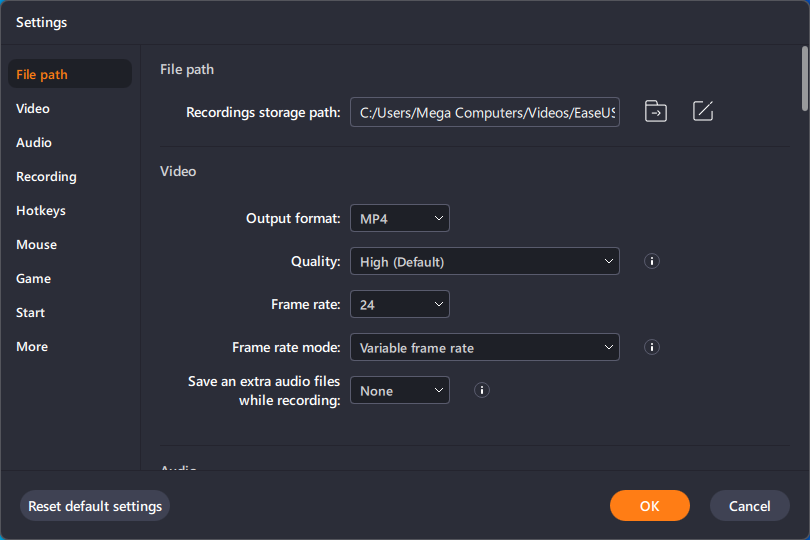
- Proper Export Settings
Pick the file settings that work with the format of your movie. Because it strikes a good mix between compression and video quality, H.264 is still a popular choice for web movies. You should make sure you choose the best export settings for your job.
Conclusion
The quality of your YouTube video uploads depends on several factors, and you must comprehend these elements to ensure that your content appears at its finest. Several crucial factors influencing video quality and advice on uploading high-quality videos to YouTube have been discussed.
First and foremost, the video parameters you select when uploading significantly impact your YouTube video’s content. For the greatest results, ensure that your video was recorded or exported at a high resolution and bitrate.
Selecting the appropriate encoding parameters, such as resolution and frame rate, is crucial for producing high-quality video. Choose resolutions such as 1080p or 4K and evaluate the optimal frame rate for your content.
Internet speed is also important. A rapid, stable Internet connection is required for uninterrupted uploading of high-quality videos. You can improve the overall quality of your videos by selecting the proper video format, employing professional video editing software, and applying color correction and grading.
Additionally, it is essential to give close attention to the bitrate and compression parameters. A higher bitrate can preserve more details and reduce compression artifacts, contributing to a higher-quality video.

Hey, I’m Hammad and welcome to this blog! I’m writing about the major sociel sites, and to help you resolve the most common problems.